Blog Archives
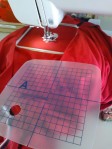
A Stitch in Time
Got the pat ch for my jacket completed, but feeling that it could be bigger so may hot foot it bag to the Fablab and enlarge the final product.
With this i needed to convert my base image to a simple black and white .bmp I did this task using GIMP a free ‘Photoshop-like’ tool by using the selection and invert selection tools to finally get the image in the format needed.
From here I needed to put the file through to conversions, this was using the software for the sewing machine which has its own file format, once you have it in the right format you can export it to a memory stick, put it in the machine and simply click start. From the first test I did I found that it wasnt think enough so I had to create two files one that stitched vertically and one that stitched horizontally. Really pleased with the outcome but think an enlargement is needed. Once I get this done I will throw up some pictures, for now have a look at the demo stuff:


Related articles
- Costume Test – Double Time (borderlandscosplay.wordpress.com)
Guns at Dawn
This weekend I was very busy at the Fablab and got numerous jobs done the first of which was the gun magazine (File is available here Shopbot PDF) Using the computer controlled Shopbot, I initially created my file in inkscape which is a free drawing program which was then saved off in a PDF format ready for importing into the Shopbot software to create my tools paths. I did need to do some editing to my original file as the lines need to be continuous so layering shapes just confuses the machine, so lesson learned there. It was great to see the magazine parts appear from a solid block of wood!


Related articles
- Gun Construction – Reload! (borderlandscosplay.wordpress.com)
Gun Construction – Reload!

ShopBot (Photo credit: Scott Beale)
 Today I have been working on creating the layout for the gun magazine ready to milled out on the ShopBot in Fablab in a couple of weeks time. I liked the look of the AK47 magazine, so I have taken my inspiration from that and imported a photo as a reference into inkscape so I could trace the outline. ShopBot requires a .PDF document to import into its software where you set cutting depths etc. As I can only get limited time with the machine I have chosen to simplify the design and add some decals/paint effects to the mag once it is completed. I think that if I could get lots of extra time I would look to mill out the logos etc. on the mag (next time
  perhaps). The notch on the top of the design is to help it attach to the gun securely, It will add a bit of weight to the finished product but I think that will help it feel more solid!
As you can see I have created in to halves to, which speeds up the cutting process and will also give a seem like its metallic real life counter part., I think the trusty glue gun might be a nice fast way to bring them together, however I may opt for nuts and bolts if time is available.
My ShopBot files are here if you want to use them, these are yet untested so use them at your peril!
Gun Construction – Scavenger Hunt
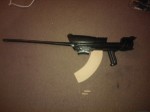
The start of my gun construction starts life out in the same way most cosplay gun builds start… a water pistol, my main gun is going to get some quite significant alterations, I am also making a ‘noisy cricket’ from another water pistol, but this will just be a paint job to transform it.
So back to my main build, the first thing I have done is to come up with a design I like the idea of; I did this by photographing my water pistol and then using good old google to search for gun parts – Barrel, Stock, Clips and sights to come up with a combination I like.

Now that I have that I can start to think about how I am going to achieve it. As I mentioned before I have access to some great tools at FabLab so I am going to use the ShopBot which can mill, cut and carve shapes out to creat my clip and possibly my gun sight too.

But while coming up with these ideas I found a kids golf club which came apart creating a handy stock and possibly the barrel too. attaching the stock was straight forward with a trusty glue gun but I am still to figure out how to attach the barrel, I thinking of doing something that can be screwed on to make transport easy.
During my scavenge for parts I found an old laser pointer that I hacked apart and have mounted inside the pumping mechanism of the gun.
 Doing it in this way meant that i could keep the battery compartment accessible and reuse the push button saving lots of time in building and soldering!
At the moment that’s as far as I have got once I have all the elements together it will be time for a paint and new post on the site to show the process I went though to make it less like a water pistol with a glued on golf club and more like a super creation of DAHL industries!
Related articles
- Custom made 3D printed Portal gun from model ripped straight from the game (boingboing.net)
- The Cosplay Insanity that Roared Through Tokyo (kotaku.com)
